Showing posts with label diy. Show all posts

Monday, November 19, 2012

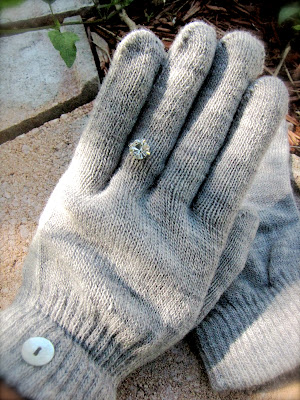
Mrs. Wedding ring gloves

I made them myself!!

Oh how I love all things bridal, newlywed, and pretty. And funny how I wanted nothing very bridal for myself, and dreamed of eloping. (We didn't, though.). 

I saw these gloves at anthro in 2009, and I thought they were adorable, but not for me. 
I think I've lost part of that demure quality about myself. I didn't want to attract much attention. I totally would rock them now. The bigger the better! 

 But they are not available. 

So I made them.

and they cost about three dollars!
Materials:
thread & needle:: I had
gloves:: $1 from Jo-ann
crystal button:: $5.50 for 2 from Jo-ann
buttons:: I had.

They are so easy to make and will be lovely gifts for any Mrs! I will gift this to my newly married sis next week. (Surprise?!)

Saturday, July 28, 2012

Bathroom before and after

    I came to the realization that I didn't love my house yet. There wasn't one room where everything was just how we liked it. We know that we're extremely fortunate to own our own home, but we know we were buying the potential more that the house as it was. It was kind of a roller coaster of emotions after closing to begin all the changes.  This house definitely was move-in ready.  Now we're making it Shawn, Leilani, and Bully ready. 

BUT NOW, I really like our bathroom! It's still got that 1950's tile that we can't renovate right now. We've made some small changes, and added personal touches, and

It's coming together y'all!!!

This was before:


The whole house is painted the same beige color. We brightened up the bathroom by painting the walls white. We used Behr Premium Plus Ultra. It's got the paint and primer in one can.

This was on the wall before. It was from Ross. I know this because the tag was still on it. In fact, most of the accessories in our home are probably from Ross! I took it down immediately, and have re purposed it. I'll show y'all later:


After:
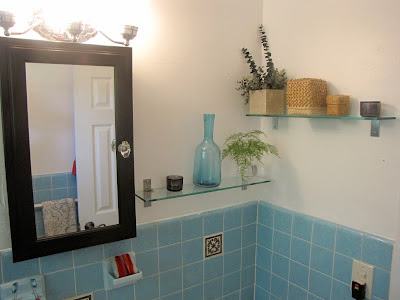
We bought the cabinet from Home Depot, similar to this one, but in Espresso.
On the wall, we installed glass shelves from Ikea, $14.99 each.
The small box of eucalyptus came with the house. 
The natural baskets are from the Philippines.
The tea lights, Ikea, $1.99
The wine decanter, $12.99 is from Ikea and will house my mouthwash.


Details:
Knob, $6, from Anthropologie:

Kate Spade Vase, $35,from Macy's:

And these place mats are from Crate and Barrel, $7.95 each. 

I decided to stop using fabric because it literally turns black within 1 day of washing. Yuck. Hopefully that will change when we sod our yard. It's all sugar sand and weeds right now, and ends up all over our floor.

On top of the toilet, I added this Crate and Barrel platter, $9.95 for more dimension. It's similar to this one, but more flat. I got this little dish at this little antique store in downtown Greensboro, NC.
It's really nice and peaceful now, which is essential for a room we use several times a day. I can't wait for you to come over and see it!!!

UPDATE!!! I was scouring other blogs, and this post is our bathroom (well not our bathroom, but someone else's before! Their after is beautiful and one day we'll fully reno. Weird!)
XOXO,
Leilani

Wednesday, July 25, 2012

This is where we've been

4th July fireworks on the beach
Oops, I've been meaning to post. It's been since the 4th of July? We haven't really gone anywhere but just had stuff like decks, gates, landscapes, and couches on our minds. I'd normally say, "Here is a sneak peak of some projects we're working on," but you will hear that too much over the next 30 years. So here is our house, and house, btw, means project:

 Jackhammers. Weekends at Home Depot. Can you handle this domestic excitement? Nothing is quite finished yet, but you can keep up with my visions on Pinterest. Oh yeah, Pinterest is another reason I've thrown this blog into abandon. And some home reno and design cool blogs I've discovered:
and

I'll get more in depth later! 


Monday, September 27, 2010

An easy, economical, fun, DIY project that's pretty, too

Last week I crafted. A lot.  I made over twenty of these orange flowers, and I still may make more.
 They are super easy to make.  The secret ingredient?


 Coffee Filters!
 So here's how I made them:

Materials:
  • 1 or 2 packs of coffee filters
  • sewing needle
  • thread
  • little puffy balls for the craft store, maybe cotton balls would work
  • Rit tangerine dye
  • Bucket
  •  
     
    • I started with several coffee filters. The less you use you will get a carnation effect, the more, sort of a weathered azalea. I'd probably use about 12 or so for each flower.
    • Thread the needle, loop it around a fuzzy craft ball a few times to make it secure,
    • Push the needle through the filters' open side, separating each layer
    • When you have your desired flower size, fasten with a fuzzy ball on the filters' flat ends, looping to secure.
    The first ones might be a little funky until you make more,  as you decide how you like them.

    Coloring them:
    • You can use spray paint or a dyebath. I was already dying other things orange, so I used the dye
    For a solid color flower, dunk.  Then hang to dry. This is there those little white balls come in handy , with the dunking and the hanging. For a creamsicle like effect I dunked a couple sides,  leaving some white. I twisted the layers when dry. For color on the petal edges, I dipped a foam brush in the dye and brushed the flower with it. They're very absorbent, but tough and not a one ripped.

    The one on the left is solid, and the middle one is merely kissed with color.

    They remind me of the Mobile Azalea Trail Maids:

    I used to watch these ladies every fourth of July parade in downtown Atl, spinning and twirling those parasols. They must have been sweating their petals off.
     So what to do with these after November?

    a mass piling on a shelf?

    or littering the mantel?

    feel free to take 'em home with you.